I🧑💻 Introduction
Your ad will appear here once approved.
If you’re studying for the CompTIA Network+ exam, having a hands-on lab is a smart way to learn. However, if you’re on a tight budget, don’t worry. This guide will show you how to build your own free virtual lab using tools like VirtualBox, Ubuntu, and Kali Linux.
But here’s the good news — you don’t need expensive equipment. In fact, with just your current computer, you can create a free virtual lab using powerful, open-source tools like VirtualBox, Ubuntu, and Kali Linux.
This guide walks you through every step. You’ll learn how to build and use your own lab to master concepts like subnetting, network scanning, and protocols.
So, whether you’re just starting out or reviewing for the exam, this setup gives you everything you need to practice confidently — without spending a cent.
🧰 What You’ll Need
No prior Linux experience — this guide is beginner-friendly!
A computer with at least 8GB of RAM (16GB is even better)
About 30–50 GB of free disk space
A stable internet connection to download tools
📦 Free Tools You’ll Use
| Tool | Purpose | Download Link |
|---|---|---|
| VirtualBox | Free virtualization software | https://www.virtualbox.org/ |
| Ubuntu | Base OS for networking labs | https://ubuntu.com/download/desktop |
| Kali Linux | Pen-testing & network scanning tools | https://www.kali.org/get-kali/ |
🔧 Step-by-Step Lab Setup
1. Install VirtualBox
- Go to the VirtualBox website
- Download the version for your OS (Windows/Linux/macOS)
- Install using default options
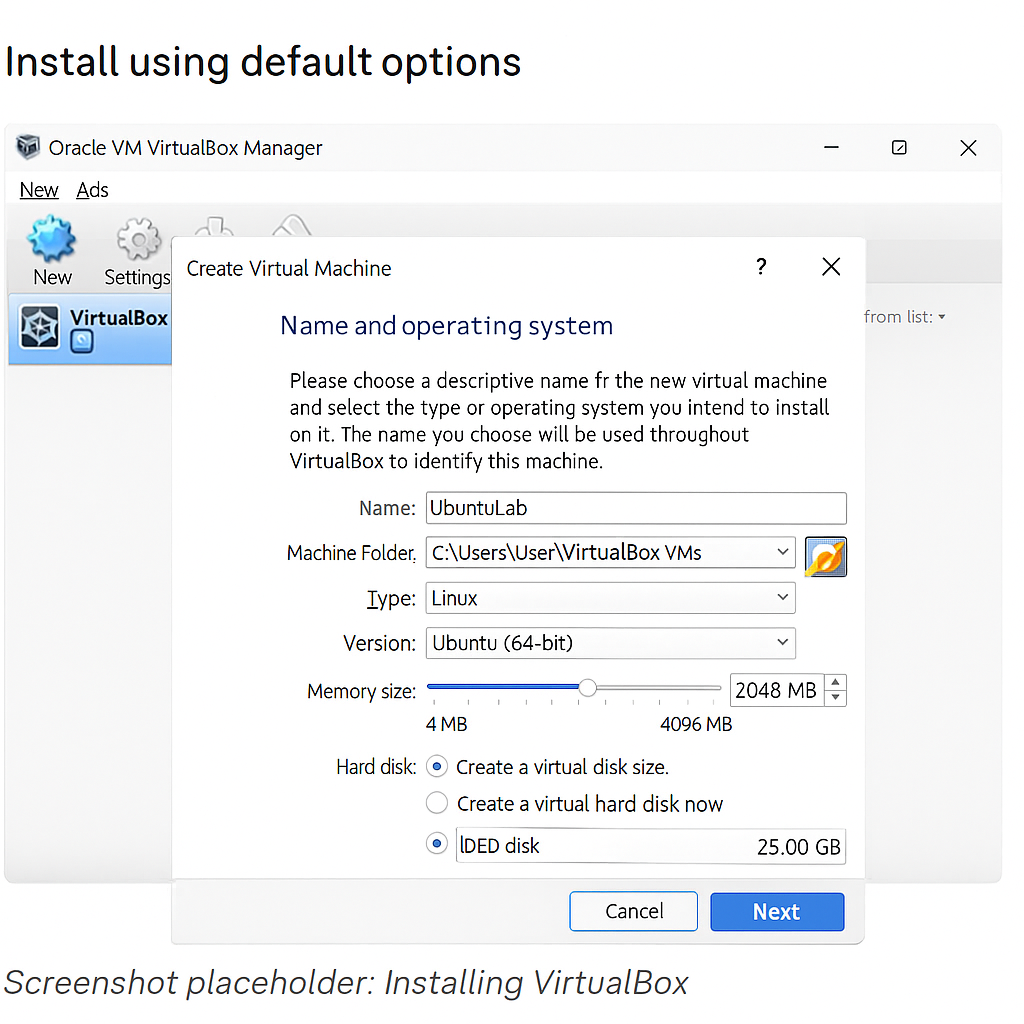
2. Download and Set Up Ubuntu VM
- Go to the Ubuntu Desktop download
- Download the ISO (22.04 LTS recommended)
- Create a new VM in VirtualBox:
- Name: UbuntuLab
- Memory: 2GB
- Storage: 25GB
- Select ISO and install
3. Download and Set Up Kali Linux VM
- Go to the Kali Linux site
- Download the VirtualBox image (recommended for faster setup)
- Import into VirtualBox: File > Import Appliance > Select Kali image
- “Install Kali Linux. Next, download the VirtualBox image.”
“This is optional. However, it’s useful for saving time.”
“Make sure you have Ubuntu installed before continuing.”
https://zumunitech.com/how-to-install-kali-linux-in-virtual-box-step-by-step/
🧪 What You Can Practice in the Lab
This setup works well for learning subnetting, scanning, and protocols. Best of all, you can practice everything without buying expensive equipment.
- Subnetting & IP Address Planning – Understand how to divide networks logically
- You’ll practice tools like ping, Traceroute, and nslookup to troubleshoot networks.
- Additionally, you’ll use Wireshark to capture and inspect packets.
- DNS & DHCP Simulations – Practice assigning IPs and managing name resolution
- Network Scanning with Nmap – Discover open ports, services, and vulnerabilities
- Creating Virtual LANs – Simulate internal networks for advanced practice
📘 Bonus Tips for Network+ Students
- First, use the “Snapshots” feature in VirtualBox to save your VM states.
- Next, always update Kali tools before using them (
sudo apt update && sudo apt upgrade). - Then, create a Host-Only Network in VirtualBox for safer testing.
- Finally, take screenshots and notes for your portfolio or blog.
📷 Coming Soon: Video Demo
Prefer a visual walkthrough? Stay tuned for a full YouTube demo showing this exact lab setup in action!
✅ Conclusion
You don’t need expensive gear to start mastering networking. With just a PC and free tools, you can simulate nearly every scenario from the Network+ exam.
Start today, take notes, and keep practicing!
If you found this helpful, feel free to share it or drop a comment below! 💬


[…] 👉 Read next:How to Build a Free Virtual Lab for Network+ – 2025 Beginner […]