🟦 INTRODUCTION
If you want to work in IT Support, Helpdesk, or remote freelance jobs, one of the most important skills is learning how to control another computer remotely.
Your ad will appear here once approved.
AnyDesk is one of the easiest tools for beginners and professionals — fast, secure, and perfect for Windows 10/11.
Additionally, this guide is designed for beginners who want to understand remote support. Furthermore, each step includes screenshots to make the learning process easier. As a result, you will be able to control another computer with confidence
In this step-by-step tutorial, I’ll show you exactly how to:
- Download & install AnyDesk
- Connect two Windows computers
- Accept permissions
- Control another PC from your laptop
- Fix common issues
- Record your own screen for tutorials
This guide includes real screenshots from two Windows devices, so you can follow the exact steps.
🟩 1. Download and Install AnyDesk (Windows 10/11)
To start remote support, install AnyDesk on both devices (your PC + your laptop).
Step 1 — Go to the official website
Open your browser and visit:
Click Download Now.
Step 2 — Run the installer
When you double-click the installer, Windows shows a security popup like this.
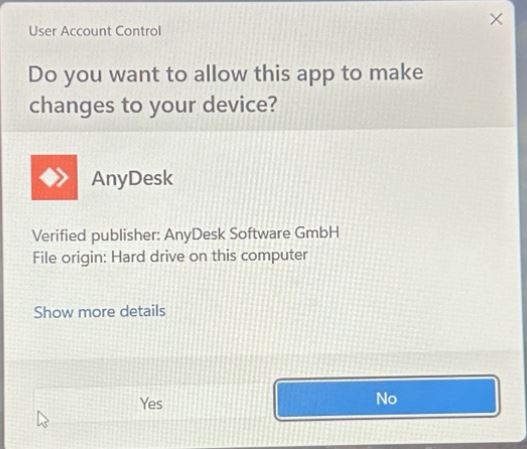
(text: “Do you want to allow this app to make changes?” → Click Yes)
This allows AnyDesk to install normally.
🟦 2. Open AnyDesk on Your Laptop
After installation, you will see the main screen showing Your Address (your unique device ID).
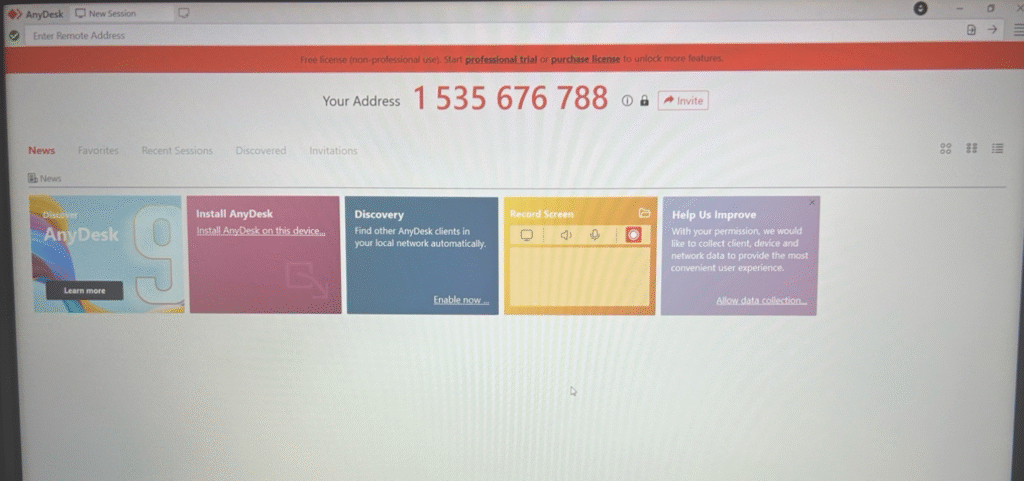
(text: “This is your AnyDesk ID. You send this to the other device.”)
This number is what the other computer uses to connect. 1535676788
🟧 3. How to Connect Your Laptop to Your PC (Remote Address)
Next, you enter the other computer’s ID.
However, before connecting, make sure both devices have a stable internet connection.
Step 1 — Type the PC’s ID
In the “Remote Address” box, type your PC’s AnyDesk
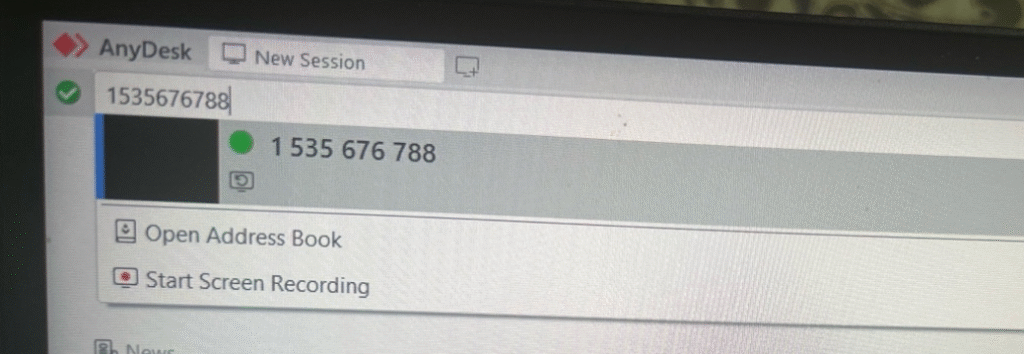
(text: “Enter the ID of the device you want to control.”)
Then press Enter or click the connection icon.
🟥 4. Accept the Remote Request (On the PC) or (laptop)
Your PC will now receive a connection request.
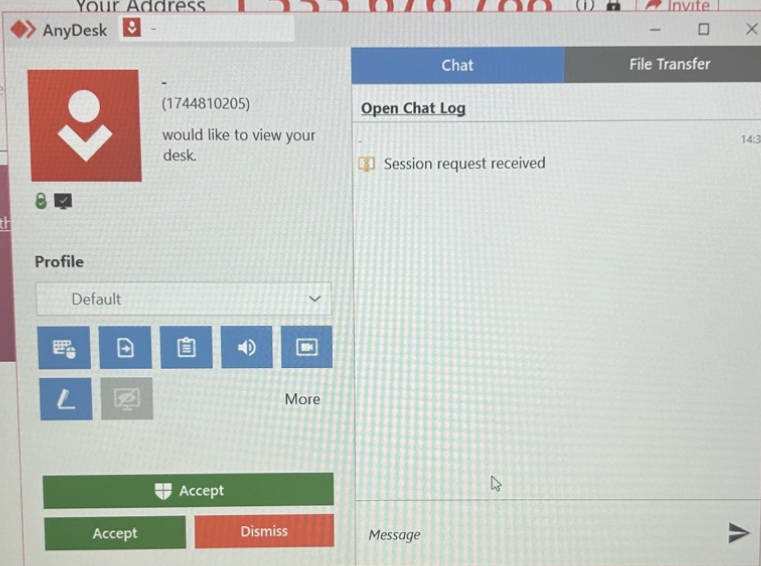
(text: “A pop-up appears on the laptop or PC asking to allow or deny access.”)
Click Accept to allow the remote session.
If you want full control (keyboard + mouse), make sure all permissions are ON.
🟦 5. Connection in Progress
You will briefly see a loading screen:
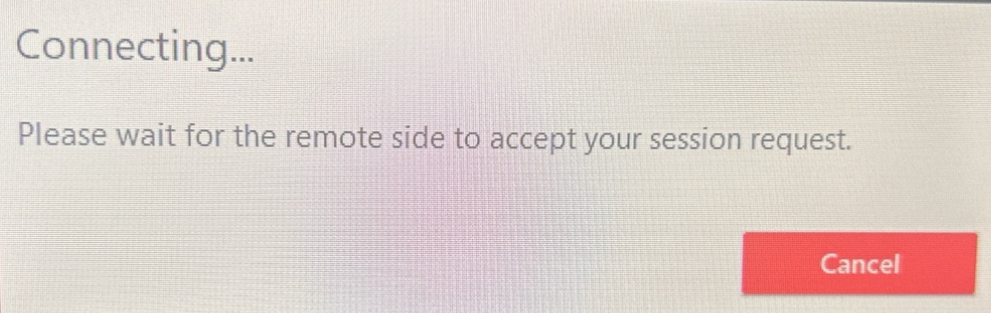
(text: “Connecting… Please wait for the other side to accept.”)
AnyDesk establishes a secure encrypted connection between your two devices.
🟩 6. Successful Remote Connection
Once connected, your laptop will display other device laptop or PC’s desktop.
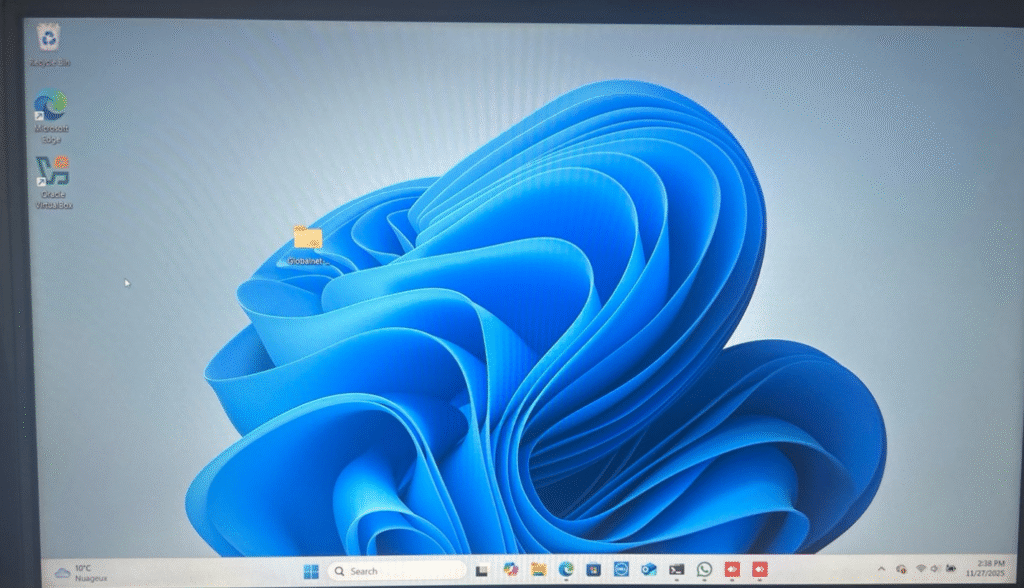
(text: “Remote desktop is visible — you can control everything from your laptop.”)
This means remote IT support is now active.
You can:
- Install software
- Configure settings
- Troubleshoot issues
- Open browsers, apps, Control Panel, etc.
This is exactly how helpdesk jobs work.
🟧 7. Enable Full Keyboard & Mouse Control
If your mouse doesn’t move on the remote screen:
- On the PC → open AnyDesk
- Go to Permissions
- Enable:
✔ Control mouse & keyboard
✔ Screen capture
✔ Clipboard
Optional: enable Unattended Access (requires password).
🟥 8. Record Screen for Tutorials (Windows 11)
If you want to make IT tutorials or reels:
✔ Use Clipchamp (built-in Windows tool):
- Windows key → type Clipchamp
- Record screen
- Save video
✔ Or use Xbox Game Bar (except desktop):
- Open Chrome/Edge
- Press Windows + Alt + R
- Recording begins
Recording works perfectly once the first app is launched.
🟦 9. Troubleshooting (Fix AnyDesk Not Working)
❗ Mouse doesn’t move
→ Permissions not enabled.
Enable keyboard + mouse access on the remote PC.
❗ Black screen
→ Hardware acceleration issue.
Disable “Privacy Mode” or update GPU drivers.
❗ ID offline
→ Device not connected to internet
→ Firewall blocking AnyDesk
❗ Slow control
→. Weak WiFi
→ Too many apps open
→ Try Ethernet cable
🟧 10. Best Use Cases for AnyDesk (IT Helpdesk)
- Helping a friend install software
- Troubleshooting Windows errors
- Teaching someone remotely
- Managing your PC at home while traveling
- Doing CompTIA A+ or Network+ labs from another device
- Supporting clients as a freelancer
🟨 11. RDP vs AnyDesk — Which Should You Use?
| Feature | AnyDesk | RDP |
|---|---|---|
| Beginner friendly | ⭐⭐⭐⭐⭐ | ⭐⭐⭐ |
| Works over internet | Yes | Harder |
| Screen sharing | Yes | Yes |
| Low latency | Yes | Yes |
| Best for IT beginners | Yes | No |
| Best for office networks | OK | Excellent |
For daily helpdesk: AnyDesk
For professional network environments: RDP
You should learn both (we will create the RDP post next)
🟦 12. Conclusion
AnyDesk is one of the fastest and simplest tools for remote IT support, especially if you’re learning A+, Network+, or preparing for remote helpdesk jobs.
You now learned how to:
- Install AnyDesk
- Get the device ID
- Send and accept connections
- Control a remote PC
- Fix permissions
- Record your own tutorial videos
This is the same method real IT technicians use every single day.
Read next:
5 Beginner-Friendly Tech Certifications to Start With in 2025